*This post may contain affiliate links for which I earn commissions.*
Recently, I baked a cherry and almond cake for a friend who was once a capable baker, but now finds it difficult to spend much time in the kitchen. She needed something she could take with her on a family visit, something simple, sturdy, and homemade. Like me, she likes cakes to be baked from scratch and does not want anything shop-bought in a box due to the extra additives such as preservatives and artificial flavourings.
A cherry cake seemed perfect… until I remembered the age-old problem: cherries sinking straight to the bottom.
I’ve made a cherry loaf cake for her before, and was quite proud of how it looked externally. However, when I asked her if it tasted okay, she reported that it was delicious, but that the fruit had mostly collected on the bottom.
This time, I was determined to rectify the issue and did some reading up about it. So if you have experienced this problem, this post is for you.
AFFILIATE DISCLAIMER
Disclosure: This post may contain affiliate links for products recommended. This means that if you click a link and buy something, I may receive some compensation, but this is at no cost to you the reader. Thank you for visiting this website.
What You’ll Need: Ingredients & Tools
The recipe I used was by Mary Berry, you’ll find it HERE
Ingredients You Will Need
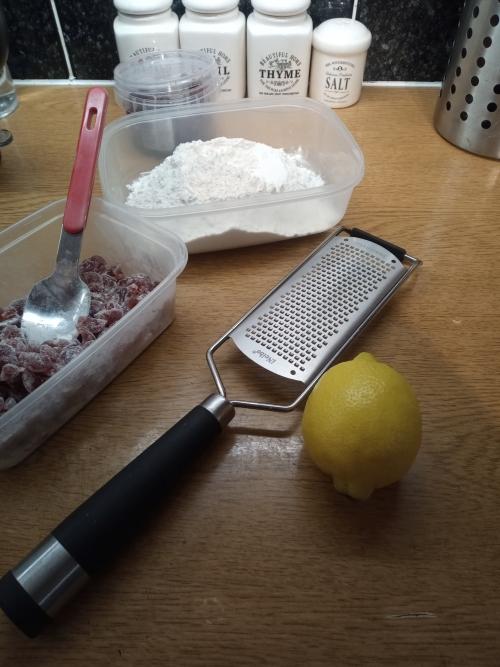
- glacé cherries – (I weighed them after washing the syrup off)
- self-raising flour
- butter (softened)
- caster sugar
- large eggs – (I used 4 small ones, as that is what I had)
- vanilla extract
- finely grated zest from 1 lemon
- ground almonds
For icing:
- icing sugar
- juice of the lemon I used for zesting
- flaked almonds and
- cherries to decorate
Helpful Kitchen Gadgets
These kitchen tools made the process so much easier:
- Bain-marie/ water-bath/ double boiler – to gently soften the butter – you could use your microwave, but I find I always manage to let it go too far
- Non-slip mixing bowl – used a glass one over the double boiler
- Digital kitchen scale – I use a Salter electronic scale for accuracy
- Lemon zester
- Inside oven thermometer – if you don’t trust your oven display reading.
- Springform cake tin – 20cm makes it easier to get the cake out. The recipe used a bundt tin or savarin mould, neither of which I had, so I just used a round cake tin. It worked out fine.
My favourite kitchen tool, and one that I use often, is my citrus zester.
The Cherry Sinking Dilemma
Cherries sink in the cake because they’re heavier than the cake batter. They come whole and covered in the slippery syrup, which makes them heavy. You’ve probably heard the old advice to “coat them in flour” – but that doesn’t always work on its own.
After repeating this cake a few times and reading tips from the experts, I’ve finally found a method that works every time. Here’s what I did:
How I Kept My Cherries Afloat: Step-by-Step Method
1. Prepare the Cherries
- Cut the sticky cherries into quarters to make them lighter
- Place the cherries in a sieve and rinse off the syrup under warm water
- Dry them thoroughly on kitchen paper
- Weigh them to get the correct weight – 200g
- Take 2 tbsp from the weighed out self-raising flour and mix it into the cherries

2. Make a Thicker Batter
- Although the recipe used the all-in-one method, I creamed the softened butter and sugar together first until it was almost pale creamy white in colour
- Add eggs one at a time, mix well
- Stir in the vanilla and the lemon zest
- Gently fold in the ground almonds and the sifted flour
- It also helps to have a stiffer batter, making it less likely for the cherries to sink
3. Layering Technique
- Spoon a third of the cake batter (without the cherries) into the lined tin
- Gently fold about two-thirds of the cherries into the rest of the batter
- Spoon the cherry cake batter on top of that third already in the tin
- This creates a base that supports the cherries
- Now scatter the last third of the cherries on to the top of the batter and gently push them down slightly so they are covered in the mixture.
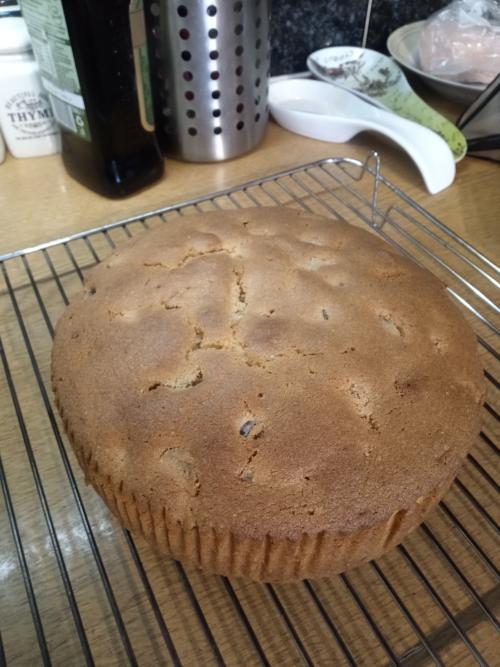
4. Bake
- Preheat oven to 160°C fan (180°C conventional)
- Bake for 40–50 minutes until a skewer comes out clean – always takes longer in my oven for some reason
- Cool in the tin for 10 mins, then on a wire rack
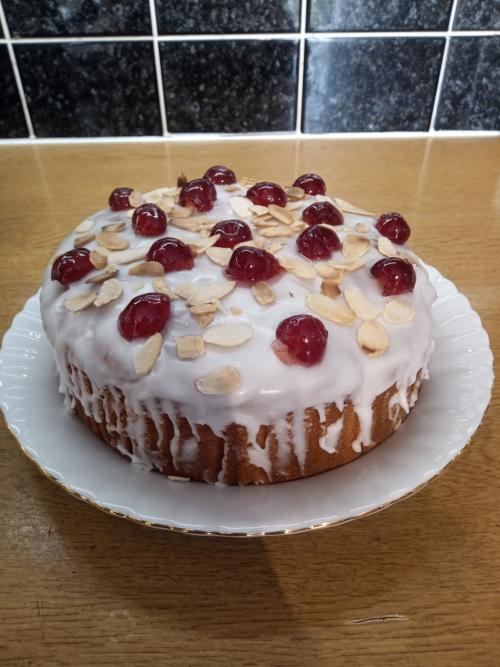
The Results: Even Fruit, Perfect Texture
Using this technique, my friend let me know that the cherries were perfectly suspended throughout the sponge. The crumb was light and moist, and the outside was a lovely golden brown.
Why This Cake Works for Gifting & Travel
- The cherry cake is sturdy but moist – definitely not a delicate cake – so it is a good one for when you are travelling with it.
- I used a glace icing as recommended in the recipe. It sets hard so there is no worry about it spilling and making a mess.
- This cake keeps well for around 3 days and can also be stored in the freezer.
Tips & Variations
It should be possible to substitute the cherries for blueberries or cranberries, but I have yet to try that out. My son has coeliac disease, so when I make it for us, I use the Doves gluten-free flour and substitute 1 for 1.
In Closing
My friend loved this cake, and I hope this guide helps you create something just as satisfying for your family. There’s something comforting about making a classic bake from scratch and knowing it will turn out well. Unlike shop-bought bakes, you know what is in them too.
Have you had trouble with sinking fruit before? Share your experiences or ask questions in the comments. I’d love to hear what works for you.